A typical business case is to prevent editing of some specific fields to a set of organizational roles in Maximo. This is typically achieved by implementing attribute data restriction or conditional UI.
However, if you need more control over what field should be readonly and when, you can use an automation script on the INIT event of the object and implement the business rules in the code.
In the following script you will find the userInGroup function that can be reused whenever needed.
#-------------------------------------------------------------------------------
# Script: MXDPOINIT
# Launch Point: PO - Initialize
# Initialize PO object
#-------------------------------------------------------------------------------
from psdi.server import MXServer

# Returns True if the user is in one of the groups
def userInGroup(grouplist):
    guSet = MXServer.getMXServer().getMboSet("GROUPUSER", mbo.getUserInfo())
    guSet.setWhere("userid='" + user + "' and groupname in (" + grouplist + ")")
    if guSet.isEmpty():
        return False
    return True

# description is readonly if the current user is not in MAXADMIN or PURCHMANAGER groups
if not userInGroup("'MAXADMIN', 'PURCHMANAGER'"):
    mbo.setFieldFlag("DESCRIPTION", mbo.READONLY, True)
Maximo sometimes does not display all the characters in a field, because the text box is too small. Of course, you can solve this. First you need to understand how Maximo determines the display size of the text box. Then you can change these setting and control how large the text box should be.
Setting default field size globally
Maximo stores the default field sizes in the file SMPDIR/maximo/applications/maximo/properties/field-size-config.xml
The default configuration for ALN fields is the following.
the display size is 2 when the database field size is smaller or equal to 2
the display size is 10 when the database field size is between 3 and 30
the display size is 40 when the database field size is equal or greater than 31
Changing the field-size-config.xml ranges will affect the display size of all fields of the specific data type.
After making any changes to the field-size-config.xml you will need to rebuild and redeploy the maximo.ear for your changes to take effect.
Changing attribute size in Database Configuration
To modify the display size of a field, you can just change the attribute size in Database Configuration so that it falls in a different range.
For example, increasing the size of an UPPER field from 15 to 35 will increase the display size from 10 to 40. This is because it will fall under another range in the field-size-config.xml file.
I don’t like this solution because I always try to define the correct attribute sizes in the database.
Setting field size Application Designer
The last approach is my preferred one. It will not increase size of all fields like the customization of field-size-config file, and does not require to change the attribute size on the database.
Many settings described below require to export the application configuration from Application Designer and modify the XML manually.
The USEFIELDSIZEGROUP attribute
If you want to change the display size of only one field on a specific application screen, you can add USEFIELDSIZEGROUP=”FALSE” to the text box properties in the application xml. Maximo will then use the database field size as the display size.
Here is an example of setting the usefieldsizegroup attribute.
In some cases you can set the exact size of a control in the application XML using the size or width attribute. However, it is not easy to find the correct attribute to set for each control.
Unfortunately, latest versions of Maximo have an inconsistent way of specifying field sizes in Application Designer so I decided to spend some time testing the different approaches on a clean Maximo 7.6.1.2 environment. I do not guarantee these settings will work on different versions of Maximo.
For my investigation I have first inspected control properties in SMPDIR/maximo/applications/maximo/properties/control-registry.xml file. Then I have tested the different combinations to verify which ones are working.
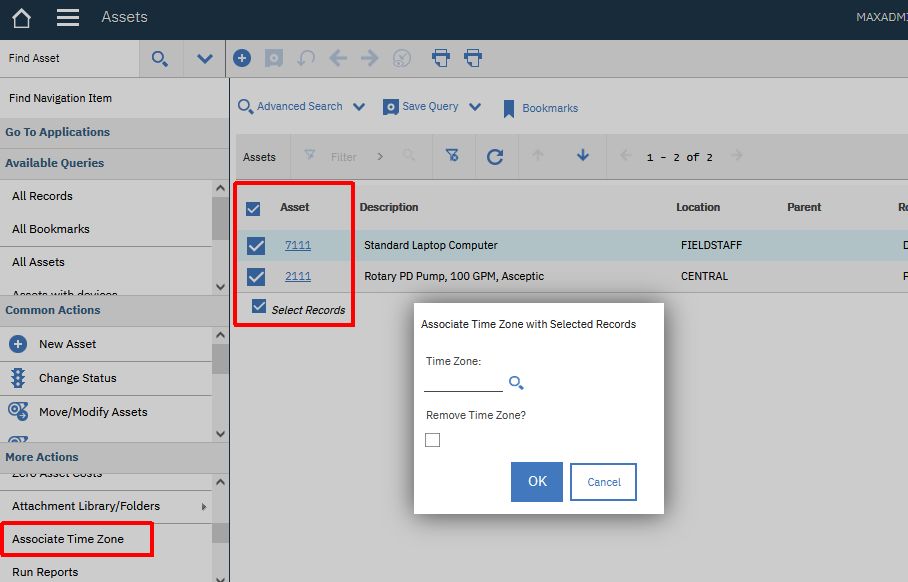
In some cases Maximo allows to perform bulk updates using actions on the List View. For example, you can set the timezone of multiple assets by selecting the Associate Time Zone on the List View of the Assets application and then a dialog will appear to perform a massive update on all the selected records.
In many cases we need to provide the same feature for some other fields. In this post I will demonstrate how to implement a bulk update feature to set the value of an attribute for a set of selected records in any Maximo application. The implementation is based on the technique described in this post and uses:
Non-persistent object
Custom dialog in the application
Signature Option in the application
Automation script to apply the update on the selected records
In the example I will build a custom dialog to set the asset’s Priority attribute. Lets start…
Non-persistent Object
The custom dialog will be based on a non-persistent object so we first need to create it using the Database Configuration application.
Object: MXDASSETBULKUPD
Description: Non persistent object for the Update Asset Priority dialog
Persistent: False
Attributes:
PRIORITY – Title: Priority – Same as: ASSET.PRIORITY – Required
Apply database configuration changes. It shouldn’t be necessary to activate the admin mode.
Application dialog
Open Application Designer and download the WOTRACK application definition. Edit the XML file with a text editor. Scroll down to the end of the file and paste the dialog definition just before the ‘presentation’ end tag.
Note that the I have used the mboname property to tell Maximo on which object the dialog is based.
Application Action
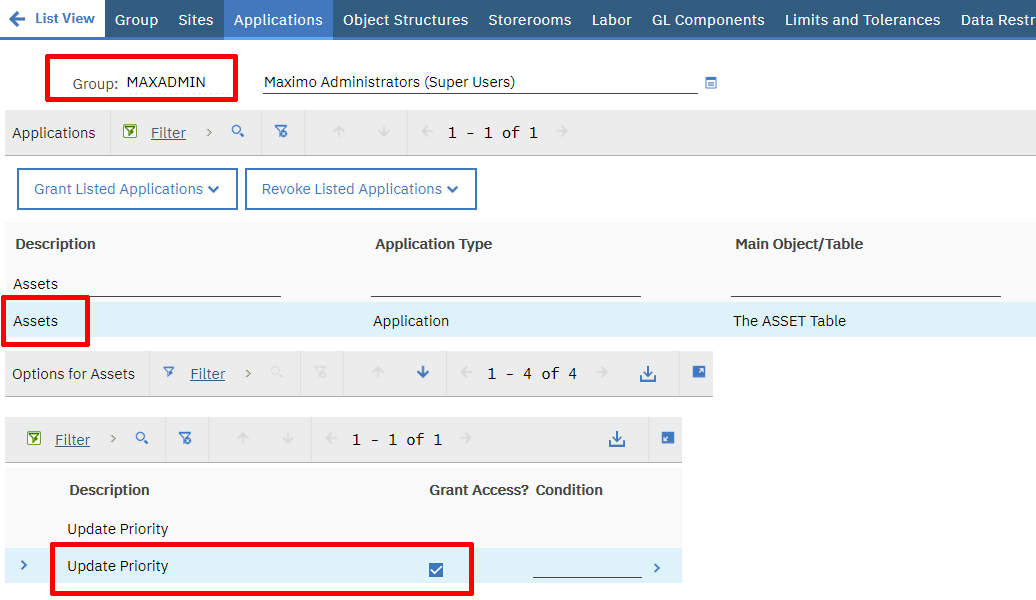
To display the Update Priority action on the List view of the Asset application we have to create a signature option and link it to the action.
Open the Asset application in Application Designer and select the Add/Modify Signature Options. Create a new signature option with the following properties:
Option: MXDASSETBULKUPD
Description: Update Priority
Advanced Option: Warning appears when this action is selected from the List page…
Now select the Add/Modify Select Action Menu and crete the Update Priority action as follows:
Element Type: OPTION
Key Value: MXDASSETBULKUPD
Position: 999
Subposition: 0
Tabs: LIST
Now we must grant MAXADMIN (and all the relevant user groups) to view and click on the Update Priority action we have just created.
You have to logout from all MAXADMIN sessions and login back in order to see the Update Priority action in the Asset application. By clicking on the action it will display our custom dialog. However, it will not perform the bulk update since we haven’t yet implemented the desired logic.
Automation Script
The massive update action will be handled by save event on the non-persistent object MXDASSETBULKUPD that on which the dialog is based.
Create an automation script as follows:
Script with Object Launch Point
Launch Point: MXDASSETBULKUPD – Asset bulk update
Object: MXDASSETBULKUPD
Event: Save – Add – Before Save
Script language: python
Script
#--------------------------------------------------------------------------
# Script: MXDASSETBULKUPD
# Launch Point: MXDASSETBULKUPD - Save - Add - Before Save
# Handle the Bulk Update dialog OK button
#--------------------------------------------------------------------------
from psdi.mbo import MboConstants
from psdi.webclient.system.beans import ResultsBean

# to get the non persistent object of the dialog we need a small trick
mbo = mboset.getMbo(0)

priority = mbo.getString("PRIORITY")

# get AppInstance object to retrieve UI properties
app = service.webclientsession().getCurrentApp()

# get the MboSet from the app
assetSet = app.getResultsBean().getMboSet()

# this is True if the Select Records check boxes are displayed
isTableSelect = app.getResultsBean().getTableStateFlags().isFlagSet(ResultsBean.TABLE_SUBSELECT_ON)

asset = assetSet.moveFirst()
while (asset):
    # if Select Records is displayed we have to take action on selected records only
    # if Select Records is NOT displayed we have to take action on all records
    if asset.isSelected() or not isTableSelect:
        asset.setValue("PRIORITY", priority)
    asset = assetSet.moveNext()

assetSet.save()
The smart trick here is to use the WebClientSession.getCurrentApp() method to get the AppInstance object and retrieve the MboSet and detect if the Select Records is selected. After that, the script cycles through the MboSet and sets the priority of all the selected records.
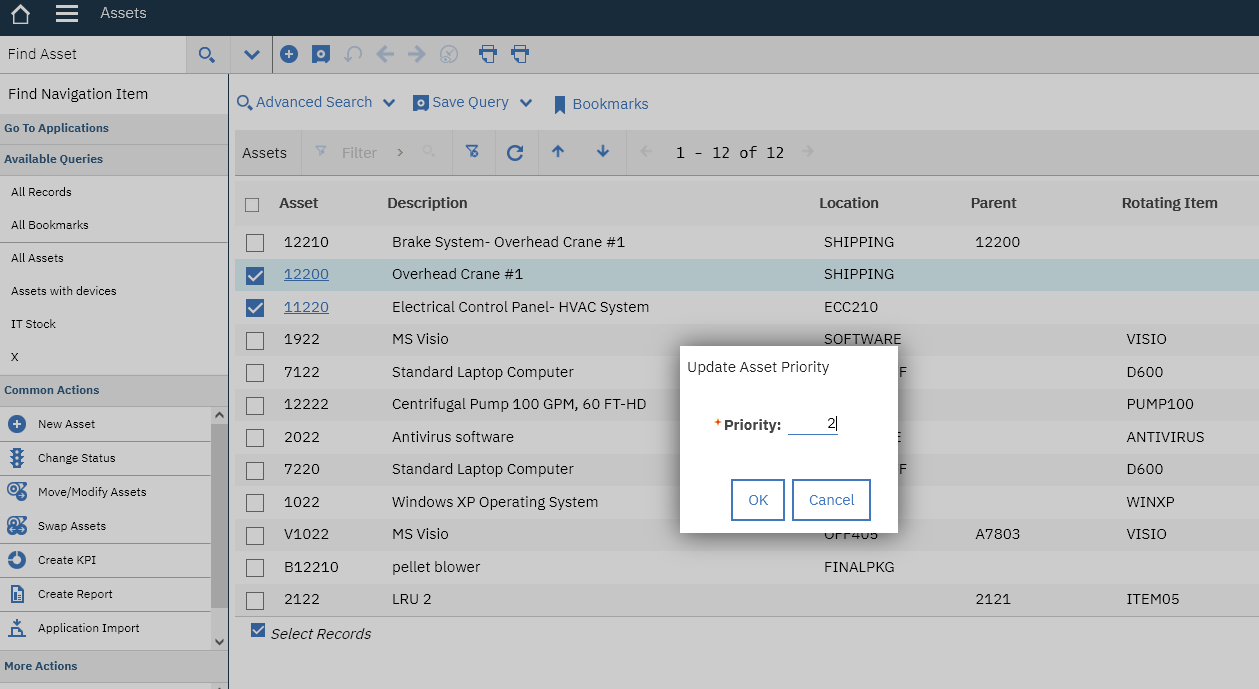
Final Test
Now everything is ready and it’s time to test. Here is what you should see.
All the selected assets will be updated with the priority specified on the bulk update dialog.