Sunday 20 February 2022

Maximo Anywhere 7.6.4 SAML SSO

 Enterprise SSO Implementation is one of the key organisation level initiative since 2020. Over the last couple of years organisation are pushing towards SSO more and more and I can think of the following reasons for it:

  1. I believe this is driven by acquired awareness among organisations around cyber security threats.
  2. The cyber security has become more important as WFH became the new normal and organisation are more vulnerable to cyber attacks with employees using internet to access sensitive information.
  3. Data is the new age gold. If you lose your data then you lose your customers. Cyber attacks are more inclined towards data breach now.
  4. SSO comes with many perks like one centralised credential storage system which it makes it easier to plan, monitor and avoid cyber attacks.
  5. Organizations can force employees to use 2-factor authentication thereby giving one more layer of security.

With SSO becoming organisational goal, thus implementing the same for Maximo has become one of the most common and high priority item. SSO using SAML tokens is the most common type of SSO implementation in the recent times. @IBM has done a great job in enabling Maximo web application with SAML SSO. SAML based SSO implementation can be smoothly implemented. This Link is one of the resource.

But the same is not true for Maximo Anywhere 7.6.4( or previous versions). IBM has clearly said that Anywhere 764 does not support SAML SSO and this will be implemented in future version of Anywhere 7.6.4. Here is an official link to IBM's statement. This link also informs that IBM can provide sample code to implement SAML SSO for Anywhere 7.6.4 but implementation is not supported.

I have recently completed the SAML SSO implementation for Anywhere 7.6.4. Implementation is much easier than 7.6.3.1 which I did in 2020.

I cannot share the code as it is BPD Zenith's IP. I can still help with below information which might help you to achieve this implementation:

  1. IBM's App store app have issues with the Cookie master plugin and also, you cannot debug the app store app thus first thing to do is to install Maximo Anywhere container. This has other implications like you need to work with client to implement some kind of MDM solution. If client does not have a MDM solution and you are looking for some kind of solution close enough to IBM Mobile First application center then please reach out to me.
  2. Raise a Case with IBM to request for the sample code for Anywhere 7.6.4's SAML SSO implementation. It comes with a document which informs you about the XMLs to change and same code for SSOHandler class. Follow the instructions, provided in the SAML documentation which will help in achieving most changes required.
  3. The only class that need to be changes is the SSO handler Class. SSO handler class will have 2 logic implementation: 1st is the logic to open InAppbrowser and 2nd is the cookie master.
  4. Sample InAppbrowser code:

cordova.InAppBrowser.open('http://apache.org', '_blank', 'location=yes');

In Appbrowser code is important as it opens a browser session inside the app where users can login to SSO provider portal and fetch SAML token.

5. The cookie master plugin given with anywhere application center has couple of typos which needs to be corrected. Once the typos in the cookies master plugin JS class is corrected then build the Native app and run a test.

6. If you run into issue, first thing to check if the cookie master logic is capturing the userid and jsessionid properly.
Friday 17 December 2021

Script to check if current user is in a Security Group

A typical business case is to prevent editing of some specific fields to a set of organizational roles in Maximo. This is typically achieved by implementing attribute data restriction or conditional UI.

However, if you need more control over what field should be readonly and when, you can use an automation script on the INIT event of the object and implement the business rules in the code.

In the following script you will find the userInGroup function that can be reused whenever needed.

#-------------------------------------------------------------------------------
# Script: MXDPOINIT
# Launch Point: PO - Initialize
# Initialize PO object
#-------------------------------------------------------------------------------
from psdi.server import MXServer

# Returns True if the user is in one of the groups
def userInGroup(grouplist):
    guSet = MXServer.getMXServer().getMboSet("GROUPUSER", mbo.getUserInfo())
    guSet.setWhere("userid='" + user + "' and groupname in (" + grouplist + ")")
    if guSet.isEmpty():
        return False
    return True

# description is readonly if the current user is not in MAXADMIN or PURCHMANAGER groups
if not userInGroup("'MAXADMIN', 'PURCHMANAGER'"):
    mbo.setFieldFlag("DESCRIPTION", mbo.READONLY, True)

Adjust field size in application

 Maximo sometimes does not display all the characters in a field, because the text box is too small. Of course, you can solve this. First you need to understand how Maximo determines the display size of the text box. Then you can change these setting and control how large the text box should be.

Setting default field size globally

Maximo stores the default field sizes in the file SMPDIR/maximo/applications/maximo/properties/field-size-config.xml

The default configuration for ALN fields is the following.

<maxtype name="aln">
    <range below="2"   size="2"/>
    <range upper="30"  size="10"/>
    <range upper="31"  size="40"/>
</maxtype>

This means that for ALN fields of type:

  • the display size is 2 when the database field size is smaller or equal to 2
  • the display size is 10 when the database field size is between 3 and 30
  • the display size is 40 when the database field size is equal or greater than 31

Changing the field-size-config.xml ranges will affect the display size of all fields of the specific data type.

After making any changes to the field-size-config.xml you will need to rebuild and redeploy the maximo.ear for your changes to take effect.

Changing attribute size in Database Configuration

To modify the display size of a field, you can just change the attribute size in Database Configuration so that it falls in a different range.

For example, increasing the size of an UPPER field from 15 to 35 will increase the display size from 10 to 40. This is because it will fall under another range in the field-size-config.xml file.

I don’t like this solution because I always try to define the correct attribute sizes in the database.

Setting field size Application Designer

The last approach is my preferred one. It will not increase size of all fields like the customization of field-size-config file, and does not require to change the attribute size on the database.

Many settings described below require to export the application configuration from Application Designer and modify the XML manually.

The USEFIELDSIZEGROUP attribute

If you want to change the display size of only one field on a specific application screen, you can add USEFIELDSIZEGROUP=”FALSE” to the text box properties in the application xml. Maximo will then use the database field size as the display size.

Here is an example of setting the usefieldsizegroup attribute.

<textbox dataattribute="siteid" id="main_grid1_3" usefieldsizegroup="false"/>

SIZE/WIDTH attributes

In some cases you can set the exact size of a control in the application XML using the size or width attribute. However, it is not easy to find the correct attribute to set for each control.

Here is an example of setting the size attribute.

 <textbox dataattribute="siteid" id="main_grid1_3" size="50"/>

Here is an example of setting the width attribute.

<textbox dataattribute="siteid" id="main_grid1_3" width="200"/>

Application controls

Unfortunately, latest versions of Maximo have an inconsistent way of specifying field sizes in Application Designer so I decided to spend some time testing the different approaches on a clean Maximo 7.6.1.2 environment. I do not guarantee these settings will work on different versions of Maximo.

For my investigation I have first inspected control properties in SMPDIR/maximo/applications/maximo/properties/control-registry.xml file. Then I have tested the different combinations to verify which ones are working.

Here is the outcome of my analysis.

ControlsizewidthusefieldsizegroupNotes
TextboxYESYESYES
MultiparttextboxYESAdjust size of the entire control.
TableYESAdjust size of all columns to fit width.
TablecolYESYES

Maximo bulk update from List view


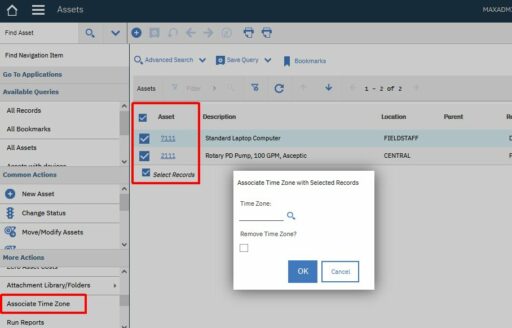
In some cases Maximo allows to perform bulk updates using actions on the List View. For example, you can set the timezone of multiple assets by selecting the Associate Time Zone on the List View of the Assets application and then a dialog will appear to perform a massive update on all the selected records.

In many cases we need to provide the same feature for some other fields. In this post I will demonstrate how to implement a bulk update feature to set the value of an attribute for a set of selected records in any Maximo application. The implementation is based on the technique described in this post and uses:

  • Non-persistent object
  • Custom dialog in the application
  • Signature Option in the application
  • Automation script to apply the update on the selected records

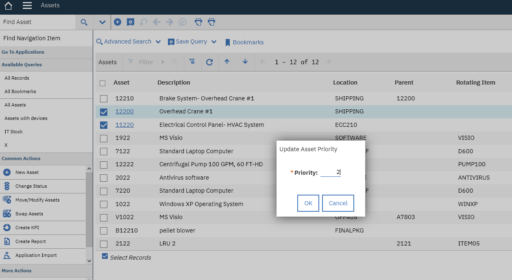
In the example I will build a custom dialog to set the asset’s Priority attribute. Lets start…

Non-persistent Object

The custom dialog will be based on a non-persistent object so we first need to create it using the Database Configuration application.

  • Object: MXDASSETBULKUPD
  • Description: Non persistent object for the Update Asset Priority dialog
  • Persistent: False
  • Attributes:
    • PRIORITY – Title: Priority – Same as: ASSET.PRIORITY – Required

Apply database configuration changes. It shouldn’t be necessary to activate the admin mode.

Application dialog

Open Application Designer and download the WOTRACK application definition. Edit the XML file with a text editor. Scroll down to the end of the file and paste the dialog definition just before the ‘presentation’ end tag.

<dialog id="mxdassetbulkupd" label="Update Asset Priority" mboname="MXDASSETBULKUPD">
  <section border="true" id="mxdassetbulkupd_1">
    <sectionrow id="mxdassetbulkupd_11">
      <sectioncol id="mxdassetbulkupd_111">
        <section id="mxdassetbulkupd_1111">
          <textbox dataattribute="PRIORITY" id="mxdassetbulkupd_PRIORITY"/>
        </section>
      </sectioncol>
    </sectionrow>
  </section>
  <buttongroup id="mxdassetbulkupd_2">
    <pushbutton id="mxdassetbulkupd_21" label="OK" mxevent="dialogok"/>
    <pushbutton id="mxdassetbulkupd_22" label="Cancel" mxevent="dialogcancel"/>
  </buttongroup>
</dialog>

Note that the I have used the mboname property to tell Maximo on which object the dialog is based.

Application Action

To display the Update Priority action on the List view of the Asset application we have to create a signature option and link it to the action.

Open the Asset application in Application Designer and select the Add/Modify Signature Options. Create a new signature option with the following properties:

  • Option: MXDASSETBULKUPD
  • Description: Update Priority
  • Advanced Option: Warning appears when this action is selected from the List page…

Now select the Add/Modify Select Action Menu and crete the Update Priority action as follows:

  • Element Type: OPTION
  • Key Value: MXDASSETBULKUPD
  • Position: 999
  • Subposition: 0
  • Tabs: LIST

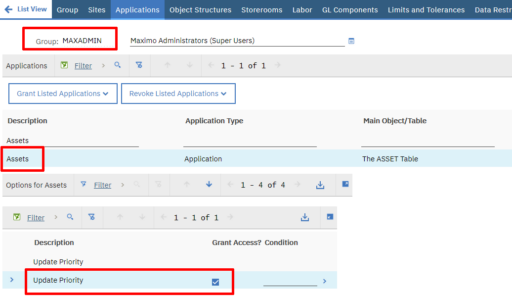
Now we must grant MAXADMIN (and all the relevant user groups) to view and click on the Update Priority action we have just created.

You have to logout from all MAXADMIN sessions and login back in order to see the Update Priority action in the Asset application. By clicking on the action it will display our custom dialog. However, it will not perform the bulk update since we haven’t yet implemented the desired logic.

Automation Script

The massive update action will be handled by save event on the non-persistent object MXDASSETBULKUPD that on which the dialog is based.

Create an automation script as follows:

  • Script with Object Launch Point
  • Launch Point: MXDASSETBULKUPD – Asset bulk update
  • Object: MXDASSETBULKUPD
  • Event: Save – Add – Before Save
  • Script language: python

Script

#--------------------------------------------------------------------------
# Script: MXDASSETBULKUPD
# Launch Point: MXDASSETBULKUPD - Save - Add - Before Save
# Handle the Bulk Update dialog OK button
#--------------------------------------------------------------------------
from psdi.mbo import MboConstants
from psdi.webclient.system.beans import ResultsBean

# to get the non persistent object of the dialog we need a small trick
mbo = mboset.getMbo(0)

priority = mbo.getString("PRIORITY")

# get AppInstance object to retrieve UI properties
app = service.webclientsession().getCurrentApp()

# get the MboSet from the app
assetSet = app.getResultsBean().getMboSet()

# this is True if the Select Records check boxes are displayed
isTableSelect = app.getResultsBean().getTableStateFlags().isFlagSet(ResultsBean.TABLE_SUBSELECT_ON)

asset = assetSet.moveFirst() 
while (asset): 
    # if Select Records is displayed we have to take action on selected records only
    # if Select Records is NOT displayed we have to take action on all records
    if asset.isSelected() or not isTableSelect:
        asset.setValue("PRIORITY", priority)
    asset = assetSet.moveNext()

assetSet.save()

The smart trick here is to use the WebClientSession.getCurrentApp() method to get the AppInstance object and retrieve the MboSet and detect if the Select Records is selected. After that, the script cycles through the MboSet and sets the priority of all the selected records.

Final Test

Now everything is ready and it’s time to test. Here is what you should see.

All the selected assets will be updated with the priority specified on the bulk update dialog.

Friday 8 October 2021

Maximo Anywhere 7.6.3.x Apps Removed from AppStores


Flashes (Alerts)


Abstract

The Maximo Anywhere 7.6.3 apps have been removed from Google Play Store and the Apple App Store

Content

The Maximo Anywhere 7.6.3 apps have been removed from Google Play Store and the Apple App Store because support for Maximo Anywhere 7.6.3.x and below ended on 31st September 2021

There is no Support Extension available

It will still be possible (but also unsupported) to build and deploy the apps by following the instructions from the Maximo Anywhere Knowledge Center https://www.ibm.com/docs/en/maximo-anywhere/7.6.3?topic=building-deploying-apps


Tuesday 10 August 2021

Maximo REST APIs examples

Update April 2021 – This post describes the old REST APIs. A tutorial on the new APIs can be found here.

In this tutorial I will show how easy it is to query and update data in Maximo using the Integration Framework (MIF) REST interface.

To send REST calls you first need to setup an HTTP/REST client. In this tutorial I will use a Google Chrome add-on called Advanced REST Client.

Retrieve a record

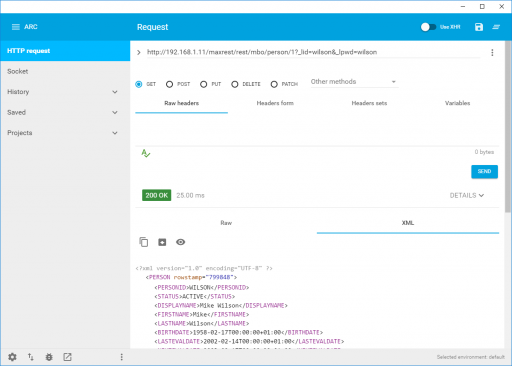
In this first example I will show you to retrieve a PERSON record from Maximo using a REST call with an HTTP GET request:

http://[MXHOST]/maxrest/rest/mbo/person/1

Probably you will get an authentication error like this:

Error 401: BMXAA0021E - User name and password combination are not valid. Try again.

This means that you have to pass the authentication credentials to your request. If you are using native authentication you can pass the _lid and _lpwd arguments as described in this example:

http://[MXHOST]/maxrest/rest/mbo/person/1?_lid=wilson&_lpwd=wilson

Now you should see the PERSON record identified by the PERSONUID=1.

NOTE: For all the examples below I will exclude the authentication arguments for simplicity.

MBO and OS resources

The REST API provides access to business objects and integration object structures.

The two calls below will provide access to the same resource:

http://[MXHOST]/maxrest/rest/mbo/person/1

http://[MXHOST]/maxrest/rest/os/mxperson/1

The first call access data straight from the PERSON object through MBO persistence layer.
The second call access data from the MXPERSON integration object structure through the MIF.
You will notice that results are slightly different.

Data format (XML or JSON)

By default Maximo retrieves data in XML format. JSON could be used instead passing the _format argument:

http://[MXHOST]/maxrest/rest/mbo/person/?_format=json

Select records

To retrieve the REVIS person record use the following REST call:

http://[MXHOST]/maxrest/rest/mbo/person/?personid=revis

Note that Maximo will perform a wildcard search by default so if you type ‘re’ instead of ‘revis’ you will get a list of records that contains ‘re’ in the PERSONID field:

http://[MXHOST]/maxrest/rest/mbo/person/?personid=re

To search with an exact match use the ~eq~ token as demonstrated in this examples:

http://[MXHOST]/maxrest/rest/mbo/person/?personid=~eq~revis

http://[MXHOST]/maxrest/rest/mbo/person/?personid=~eq~re

Results can be sorted using the _orderby_orderbyasc or _orderbydesc argument. Multiple attributes can be passed separated by a comma character.

http://[MXHOST]/maxrest/rest/mbo/person/?personid=re&_orderby=statusdate

http://[MXHOST]/maxrest/rest/mbo/person/?personid=re&_orderby=status,statusdate

Create or Update a record (AddChange)

To create an existing record the AddChange action can be used. The following example will create a new person named RESTINT. Note that in this case a POST request must be used instead of a GET.

http://[MXHOST]/maxrest/rest/mbo/person/?_action=addchange&personid=restint&firstname=Rest&lastname=Int

To update the same record we can use the PERSONUID returned from the create. In my example it’s 161.

http://[MXHOST]/maxrest/rest/mbo/person/161?_action=addchange&personid=restint&firstname=RestNew&lastname=IntNew

Updating child objects

Lets now pretend we need to update an asset specification and one of its attributes. You will see things are now a little more complex.

First of all we can create a new asset with a POST request.

http://[MXHOST]/maxrest/rest/mbo/ASSET/?assetnum=myasset01&siteid=BEDFORD&description=TestTest

Take note of your ASSETUID and query the new record with a GET request.

http://[MXHOST]/maxrest/rest/mbo/ASSET/2585

Now login to Maximo, classify the MYASSET01 as a BEARING, add an ALN attribute and save it.
If you query the asset using the GET request above you will notice that you just have a CLASSSTRUCTUREID attribute with a number in it specifying the classification. This is not usable in our scenario and will not allow to update attribute.

The right approach is to switch to the object service structure. Try to query the new record with a GET request like this:

http://[MXHOST]/maxrest/rest/os/MXASSET/2585

You will see that the HIERARCHYPATH field is now available and a subelement ASSETSPEC returns the attribute.
If we now want to update the value of the ALN attribute we can use a POST with a dotted notation like this:

…/MXASSET/2585?ASSETSPEC.1.ASSETATTRID=BEARTYPE&ASSETSPEC.1.ALNVALUE=ABC&ASSETSPEC.1.LINEARASSETSPECID=0

If you want to set a new classification here’s an example:

http://[MXHOST]/maxrest/rest/os/MXASSET/2585?hierarchypath=BEARING%20\%20ROLLER

Note how the spaces have been encoded in the URL with the ‘%20’ string. Hope this can help all of us dealing with integration scenarios using REST calls…

Friday 6 August 2021

PREPARE FOR MAXIMO 7.6.0 END OF SUPPORT (EOS)


On September 8, 2020, IBM announced the end of support for Maximo 7.6.0.x, Industry Solutions, and Add-Ons. The official announcement letter was #920-136.

As of September 30, 2021, any fixes, patches, and telephone support will no longer be provided for Maximo 7.6.0.x

This announcement provides current clients 12 months prepare for and conduct an upgrade to at least Maximo 7.6.1.2.


CAN I STILL USE MAXIMO 7.6.0 IF IT’S NO LONGER SUPPORTED?

Yes, and we recommend you purchase “extended support,” while you are planning your path to upgrade.

TRM of course can assist you in the planning for the upgrade. TRM has performed 100’s of upgrades over the years for clients in many different situations.


WHAT ARE THE BENEFITS OF UPGRADING TO MAXIMO 7.6.1.2?

Maximo 7.6.1.2 has several enhancements, one of which is the furtherance of Work Centers, an alternative user interface better suited for mobile users. Other features such as Inspections, Budget Monitoring and License Monitoring may be of interest to your business.

The need for an upgrade might also be the impetus for you to move your on-prem Maximo to be hosted by TRM in the cloud. TRM has programs to make this process less disruptive and financially beneficial to you.


CAN I UPGRADE TO MAS 8?

Yes. There are several paths you can take to move into Maximo Application Suite (MAS). Note that the licensing approach to MAS is different than that of traditional Maximo. App Points are now used to entitle your users to the various elements of MAS. TRM can assist you in developing a strategy to move from the licensing you have now to App Points.

IBM Readme for IBM Maximo Asset Management 7.6.1.3 Fix Pack

  Fix Readme Abstract This fix pack updates IBM® Maximo® Asset Management version 7.6.1, 7.6.1.1, and 7.6.1.2 Content IBM Maximo Asset Manag...