Friday 17 December 2021

Script to check if current user is in a Security Group

A typical business case is to prevent editing of some specific fields to a set of organizational roles in Maximo. This is typically achieved by implementing attribute data restriction or conditional UI.

However, if you need more control over what field should be readonly and when, you can use an automation script on the INIT event of the object and implement the business rules in the code.

In the following script you will find the userInGroup function that can be reused whenever needed.

#-------------------------------------------------------------------------------
# Script: MXDPOINIT
# Launch Point: PO - Initialize
# Initialize PO object
#-------------------------------------------------------------------------------
from psdi.server import MXServer

# Returns True if the user is in one of the groups
def userInGroup(grouplist):
    guSet = MXServer.getMXServer().getMboSet("GROUPUSER", mbo.getUserInfo())
    guSet.setWhere("userid='" + user + "' and groupname in (" + grouplist + ")")
    if guSet.isEmpty():
        return False
    return True

# description is readonly if the current user is not in MAXADMIN or PURCHMANAGER groups
if not userInGroup("'MAXADMIN', 'PURCHMANAGER'"):
    mbo.setFieldFlag("DESCRIPTION", mbo.READONLY, True)

Adjust field size in application

 Maximo sometimes does not display all the characters in a field, because the text box is too small. Of course, you can solve this. First you need to understand how Maximo determines the display size of the text box. Then you can change these setting and control how large the text box should be.

Setting default field size globally

Maximo stores the default field sizes in the file SMPDIR/maximo/applications/maximo/properties/field-size-config.xml

The default configuration for ALN fields is the following.

<maxtype name="aln">
    <range below="2"   size="2"/>
    <range upper="30"  size="10"/>
    <range upper="31"  size="40"/>
</maxtype>

This means that for ALN fields of type:

  • the display size is 2 when the database field size is smaller or equal to 2
  • the display size is 10 when the database field size is between 3 and 30
  • the display size is 40 when the database field size is equal or greater than 31

Changing the field-size-config.xml ranges will affect the display size of all fields of the specific data type.

After making any changes to the field-size-config.xml you will need to rebuild and redeploy the maximo.ear for your changes to take effect.

Changing attribute size in Database Configuration

To modify the display size of a field, you can just change the attribute size in Database Configuration so that it falls in a different range.

For example, increasing the size of an UPPER field from 15 to 35 will increase the display size from 10 to 40. This is because it will fall under another range in the field-size-config.xml file.

I don’t like this solution because I always try to define the correct attribute sizes in the database.

Setting field size Application Designer

The last approach is my preferred one. It will not increase size of all fields like the customization of field-size-config file, and does not require to change the attribute size on the database.

Many settings described below require to export the application configuration from Application Designer and modify the XML manually.

The USEFIELDSIZEGROUP attribute

If you want to change the display size of only one field on a specific application screen, you can add USEFIELDSIZEGROUP=”FALSE” to the text box properties in the application xml. Maximo will then use the database field size as the display size.

Here is an example of setting the usefieldsizegroup attribute.

<textbox dataattribute="siteid" id="main_grid1_3" usefieldsizegroup="false"/>

SIZE/WIDTH attributes

In some cases you can set the exact size of a control in the application XML using the size or width attribute. However, it is not easy to find the correct attribute to set for each control.

Here is an example of setting the size attribute.

 <textbox dataattribute="siteid" id="main_grid1_3" size="50"/>

Here is an example of setting the width attribute.

<textbox dataattribute="siteid" id="main_grid1_3" width="200"/>

Application controls

Unfortunately, latest versions of Maximo have an inconsistent way of specifying field sizes in Application Designer so I decided to spend some time testing the different approaches on a clean Maximo 7.6.1.2 environment. I do not guarantee these settings will work on different versions of Maximo.

For my investigation I have first inspected control properties in SMPDIR/maximo/applications/maximo/properties/control-registry.xml file. Then I have tested the different combinations to verify which ones are working.

Here is the outcome of my analysis.

ControlsizewidthusefieldsizegroupNotes
TextboxYESYESYES
MultiparttextboxYESAdjust size of the entire control.
TableYESAdjust size of all columns to fit width.
TablecolYESYES

Maximo bulk update from List view


In some cases Maximo allows to perform bulk updates using actions on the List View. For example, you can set the timezone of multiple assets by selecting the Associate Time Zone on the List View of the Assets application and then a dialog will appear to perform a massive update on all the selected records.

In many cases we need to provide the same feature for some other fields. In this post I will demonstrate how to implement a bulk update feature to set the value of an attribute for a set of selected records in any Maximo application. The implementation is based on the technique described in this post and uses:

  • Non-persistent object
  • Custom dialog in the application
  • Signature Option in the application
  • Automation script to apply the update on the selected records

In the example I will build a custom dialog to set the asset’s Priority attribute. Lets start…

Non-persistent Object

The custom dialog will be based on a non-persistent object so we first need to create it using the Database Configuration application.

  • Object: MXDASSETBULKUPD
  • Description: Non persistent object for the Update Asset Priority dialog
  • Persistent: False
  • Attributes:
    • PRIORITY – Title: Priority – Same as: ASSET.PRIORITY – Required

Apply database configuration changes. It shouldn’t be necessary to activate the admin mode.

Application dialog

Open Application Designer and download the WOTRACK application definition. Edit the XML file with a text editor. Scroll down to the end of the file and paste the dialog definition just before the ‘presentation’ end tag.

<dialog id="mxdassetbulkupd" label="Update Asset Priority" mboname="MXDASSETBULKUPD">
  <section border="true" id="mxdassetbulkupd_1">
    <sectionrow id="mxdassetbulkupd_11">
      <sectioncol id="mxdassetbulkupd_111">
        <section id="mxdassetbulkupd_1111">
          <textbox dataattribute="PRIORITY" id="mxdassetbulkupd_PRIORITY"/>
        </section>
      </sectioncol>
    </sectionrow>
  </section>
  <buttongroup id="mxdassetbulkupd_2">
    <pushbutton id="mxdassetbulkupd_21" label="OK" mxevent="dialogok"/>
    <pushbutton id="mxdassetbulkupd_22" label="Cancel" mxevent="dialogcancel"/>
  </buttongroup>
</dialog>

Note that the I have used the mboname property to tell Maximo on which object the dialog is based.

Application Action

To display the Update Priority action on the List view of the Asset application we have to create a signature option and link it to the action.

Open the Asset application in Application Designer and select the Add/Modify Signature Options. Create a new signature option with the following properties:

  • Option: MXDASSETBULKUPD
  • Description: Update Priority
  • Advanced Option: Warning appears when this action is selected from the List page…

Now select the Add/Modify Select Action Menu and crete the Update Priority action as follows:

  • Element Type: OPTION
  • Key Value: MXDASSETBULKUPD
  • Position: 999
  • Subposition: 0
  • Tabs: LIST

Now we must grant MAXADMIN (and all the relevant user groups) to view and click on the Update Priority action we have just created.

You have to logout from all MAXADMIN sessions and login back in order to see the Update Priority action in the Asset application. By clicking on the action it will display our custom dialog. However, it will not perform the bulk update since we haven’t yet implemented the desired logic.

Automation Script

The massive update action will be handled by save event on the non-persistent object MXDASSETBULKUPD that on which the dialog is based.

Create an automation script as follows:

  • Script with Object Launch Point
  • Launch Point: MXDASSETBULKUPD – Asset bulk update
  • Object: MXDASSETBULKUPD
  • Event: Save – Add – Before Save
  • Script language: python

Script

#--------------------------------------------------------------------------
# Script: MXDASSETBULKUPD
# Launch Point: MXDASSETBULKUPD - Save - Add - Before Save
# Handle the Bulk Update dialog OK button
#--------------------------------------------------------------------------
from psdi.mbo import MboConstants
from psdi.webclient.system.beans import ResultsBean

# to get the non persistent object of the dialog we need a small trick
mbo = mboset.getMbo(0)

priority = mbo.getString("PRIORITY")

# get AppInstance object to retrieve UI properties
app = service.webclientsession().getCurrentApp()

# get the MboSet from the app
assetSet = app.getResultsBean().getMboSet()

# this is True if the Select Records check boxes are displayed
isTableSelect = app.getResultsBean().getTableStateFlags().isFlagSet(ResultsBean.TABLE_SUBSELECT_ON)

asset = assetSet.moveFirst() 
while (asset): 
    # if Select Records is displayed we have to take action on selected records only
    # if Select Records is NOT displayed we have to take action on all records
    if asset.isSelected() or not isTableSelect:
        asset.setValue("PRIORITY", priority)
    asset = assetSet.moveNext()

assetSet.save()

The smart trick here is to use the WebClientSession.getCurrentApp() method to get the AppInstance object and retrieve the MboSet and detect if the Select Records is selected. After that, the script cycles through the MboSet and sets the priority of all the selected records.

Final Test

Now everything is ready and it’s time to test. Here is what you should see.

All the selected assets will be updated with the priority specified on the bulk update dialog.

Friday 8 October 2021

Maximo Anywhere 7.6.3.x Apps Removed from AppStores


Flashes (Alerts)


Abstract

The Maximo Anywhere 7.6.3 apps have been removed from Google Play Store and the Apple App Store

Content

The Maximo Anywhere 7.6.3 apps have been removed from Google Play Store and the Apple App Store because support for Maximo Anywhere 7.6.3.x and below ended on 31st September 2021

There is no Support Extension available

It will still be possible (but also unsupported) to build and deploy the apps by following the instructions from the Maximo Anywhere Knowledge Center https://www.ibm.com/docs/en/maximo-anywhere/7.6.3?topic=building-deploying-apps


Tuesday 10 August 2021

Maximo REST APIs examples

Update April 2021 – This post describes the old REST APIs. A tutorial on the new APIs can be found here.

In this tutorial I will show how easy it is to query and update data in Maximo using the Integration Framework (MIF) REST interface.

To send REST calls you first need to setup an HTTP/REST client. In this tutorial I will use a Google Chrome add-on called Advanced REST Client.

Retrieve a record

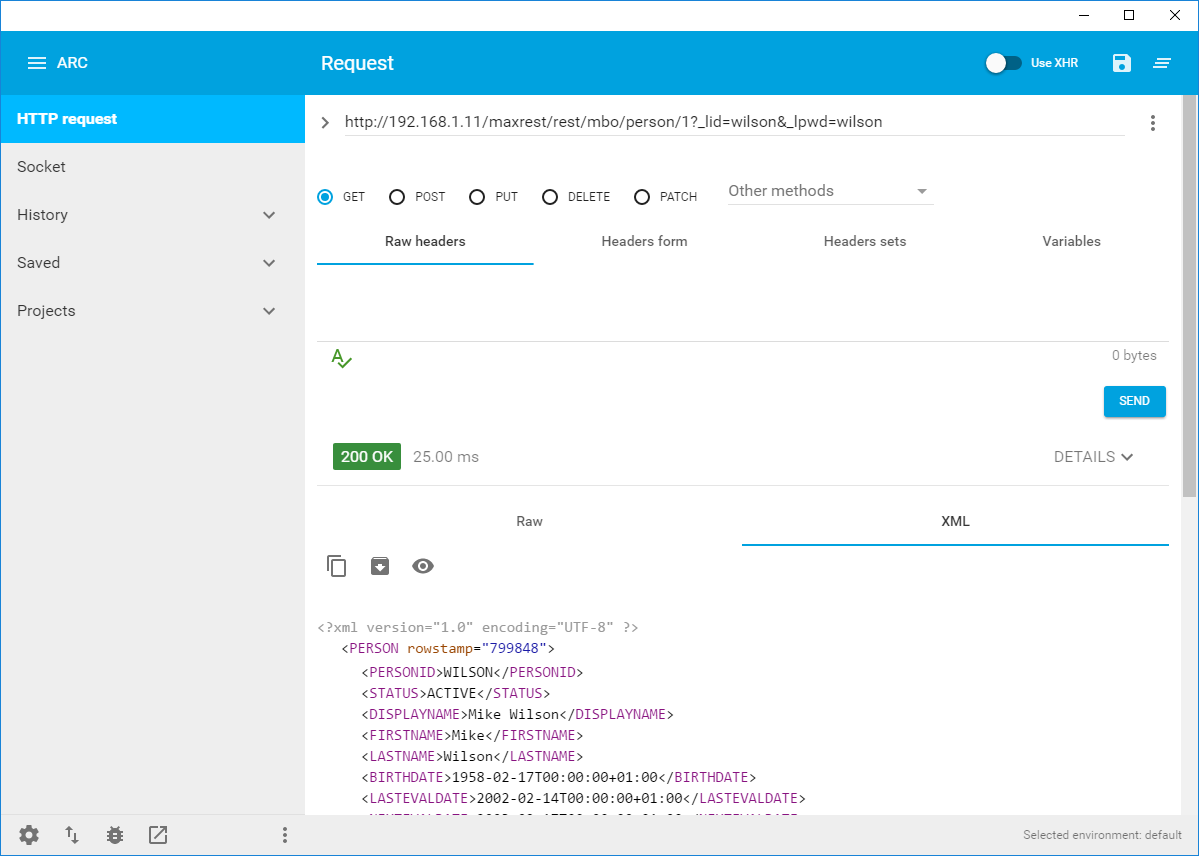
In this first example I will show you to retrieve a PERSON record from Maximo using a REST call with an HTTP GET request:

http://[MXHOST]/maxrest/rest/mbo/person/1

Probably you will get an authentication error like this:

Error 401: BMXAA0021E - User name and password combination are not valid. Try again.

This means that you have to pass the authentication credentials to your request. If you are using native authentication you can pass the _lid and _lpwd arguments as described in this example:

http://[MXHOST]/maxrest/rest/mbo/person/1?_lid=wilson&_lpwd=wilson

Now you should see the PERSON record identified by the PERSONUID=1.

NOTE: For all the examples below I will exclude the authentication arguments for simplicity.

MBO and OS resources

The REST API provides access to business objects and integration object structures.

The two calls below will provide access to the same resource:

http://[MXHOST]/maxrest/rest/mbo/person/1

http://[MXHOST]/maxrest/rest/os/mxperson/1

The first call access data straight from the PERSON object through MBO persistence layer.
The second call access data from the MXPERSON integration object structure through the MIF.
You will notice that results are slightly different.

Data format (XML or JSON)

By default Maximo retrieves data in XML format. JSON could be used instead passing the _format argument:

http://[MXHOST]/maxrest/rest/mbo/person/?_format=json

Select records

To retrieve the REVIS person record use the following REST call:

http://[MXHOST]/maxrest/rest/mbo/person/?personid=revis

Note that Maximo will perform a wildcard search by default so if you type ‘re’ instead of ‘revis’ you will get a list of records that contains ‘re’ in the PERSONID field:

http://[MXHOST]/maxrest/rest/mbo/person/?personid=re

To search with an exact match use the ~eq~ token as demonstrated in this examples:

http://[MXHOST]/maxrest/rest/mbo/person/?personid=~eq~revis

http://[MXHOST]/maxrest/rest/mbo/person/?personid=~eq~re

Results can be sorted using the _orderby_orderbyasc or _orderbydesc argument. Multiple attributes can be passed separated by a comma character.

http://[MXHOST]/maxrest/rest/mbo/person/?personid=re&_orderby=statusdate

http://[MXHOST]/maxrest/rest/mbo/person/?personid=re&_orderby=status,statusdate

Create or Update a record (AddChange)

To create an existing record the AddChange action can be used. The following example will create a new person named RESTINT. Note that in this case a POST request must be used instead of a GET.

http://[MXHOST]/maxrest/rest/mbo/person/?_action=addchange&personid=restint&firstname=Rest&lastname=Int

To update the same record we can use the PERSONUID returned from the create. In my example it’s 161.

http://[MXHOST]/maxrest/rest/mbo/person/161?_action=addchange&personid=restint&firstname=RestNew&lastname=IntNew

Updating child objects

Lets now pretend we need to update an asset specification and one of its attributes. You will see things are now a little more complex.

First of all we can create a new asset with a POST request.

http://[MXHOST]/maxrest/rest/mbo/ASSET/?assetnum=myasset01&siteid=BEDFORD&description=TestTest

Take note of your ASSETUID and query the new record with a GET request.

http://[MXHOST]/maxrest/rest/mbo/ASSET/2585

Now login to Maximo, classify the MYASSET01 as a BEARING, add an ALN attribute and save it.
If you query the asset using the GET request above you will notice that you just have a CLASSSTRUCTUREID attribute with a number in it specifying the classification. This is not usable in our scenario and will not allow to update attribute.

The right approach is to switch to the object service structure. Try to query the new record with a GET request like this:

http://[MXHOST]/maxrest/rest/os/MXASSET/2585

You will see that the HIERARCHYPATH field is now available and a subelement ASSETSPEC returns the attribute.
If we now want to update the value of the ALN attribute we can use a POST with a dotted notation like this:

…/MXASSET/2585?ASSETSPEC.1.ASSETATTRID=BEARTYPE&ASSETSPEC.1.ALNVALUE=ABC&ASSETSPEC.1.LINEARASSETSPECID=0

If you want to set a new classification here’s an example:

http://[MXHOST]/maxrest/rest/os/MXASSET/2585?hierarchypath=BEARING%20\%20ROLLER

Note how the spaces have been encoded in the URL with the ‘%20’ string. Hope this can help all of us dealing with integration scenarios using REST calls…

Friday 6 August 2021

PREPARE FOR MAXIMO 7.6.0 END OF SUPPORT (EOS)


On September 8, 2020, IBM announced the end of support for Maximo 7.6.0.x, Industry Solutions, and Add-Ons. The official announcement letter was #920-136.

As of September 30, 2021, any fixes, patches, and telephone support will no longer be provided for Maximo 7.6.0.x

This announcement provides current clients 12 months prepare for and conduct an upgrade to at least Maximo 7.6.1.2.


CAN I STILL USE MAXIMO 7.6.0 IF IT’S NO LONGER SUPPORTED?

Yes, and we recommend you purchase “extended support,” while you are planning your path to upgrade.

TRM of course can assist you in the planning for the upgrade. TRM has performed 100’s of upgrades over the years for clients in many different situations.


WHAT ARE THE BENEFITS OF UPGRADING TO MAXIMO 7.6.1.2?

Maximo 7.6.1.2 has several enhancements, one of which is the furtherance of Work Centers, an alternative user interface better suited for mobile users. Other features such as Inspections, Budget Monitoring and License Monitoring may be of interest to your business.

The need for an upgrade might also be the impetus for you to move your on-prem Maximo to be hosted by TRM in the cloud. TRM has programs to make this process less disruptive and financially beneficial to you.


CAN I UPGRADE TO MAS 8?

Yes. There are several paths you can take to move into Maximo Application Suite (MAS). Note that the licensing approach to MAS is different than that of traditional Maximo. App Points are now used to entitle your users to the various elements of MAS. TRM can assist you in developing a strategy to move from the licensing you have now to App Points.

What's New In Maximo's 7.6.1.2 Feature Pack


Maximo v7.6.1.2 was released by IBM on July 24, 2020 and brings new functionality to the user community of the world class asset management solution. IBM continues to take notes from their user community to enhance the solution to best fit the needs of their maintenance program, enabling them to continuously optimize and improve the reliability of their assets and decrease maintenance costs.


The updates in Maximo 7.6.1.2 are broken up into:


  • Currency updates
  • Technical Enhancements
  • Functional Enhancements
  • Push notifications

Here is the top new functionality in Maximo's 7.6.1.2 feature pack:


1. Multiple Attachments in Maximo 7.6.1.2

You can now attach multiple files simultaneously.


2. Update Drilldown Capability in Maximo 7.6.1.2

The Drilldown navigation has a refreshed look and feel and provides greater access to more related data and actions. You can now drilldown to PM’s, Job Plans, and Spare Parts, view details on related records, and Drag and Drop to move assets or locations.


3. New Inventory and Storeroom Updates in Maximo 7.6.1.2

Users can now create storeroom hierarchies, add items to multiple storerooms, and set a default reorder storeroom. There are also additional details which can now be specified when adding to storeroom.


Picking & Staging

In the Inventory Work Centers users have the new functionality of “Pick & Stage” This gives the options of:

  • Open: Reservations waiting to be processes
  • Picked: Removed from the shelf but not yet staged or issued
  • Staged: Physically moved to staging area in anticipation of issue
  • Issued: Removed from inventory, financial transaction written
  • Review: History of what happened

Reconciliation Preview

Inventory Work Centers now give users the ability to reconcile physical counts under the “Reconcile” tab. This provides enables users to review reconcile before executing the reconcile process and is a visual indicator of proposed changes to easily identify problem areas needing further investigation.


Barcode Scanning

Barcode scanning is now available wherever the user is selecting bin or item. The camera opens in video mode and snaps the picture once it is in focus. An audible beep will sound indicating success.


Condition-Enabled Items

Lastly, updates to the Inventory Work Centers help users better manage Condition Enabled Items by supporting setting condition enables items, managing condition codes for the item or set, and using smart controls when saving to keep data accurate.


4. Updated Browser Support for Maximo 7.6.1.2

Maximo will now be supported in Microsoft Edge Chromium.


5. Data import from IBM Digital Twin Exchange in Maximo 7.6.1.2

This latest release of Maximo now supports an import capability allowing data from IBM’s Digital Twin Exchange to be brought into Maximo.


6. Cognos Entitlement in Maximo 7.6.1.2

Maximo users now have access to Cognos v11.0.13 which provides additional reporting and analytic capability.


7. Push Notifications in maximo 7.6.1.2

Users can subscribe to events within Maximo Asset Management and will receive an automatic push notification to their supported iOS or Android mobile device when an event or data change occurs. Use the new Push Notification Administration Application to configure this setting on your mobile device.

8. IoT Connectivity in Maximo 7.6.1.2

In Maximo 7.6.1.2, an IoT connector was added into the administration work center. This helps increase connectivity within IoT platforms. After configuration, this allows you to associate an IoT device with a specific asset or location. 

This product includes content to support

  • IBM Watson IoT
  • IBM Watson Asset Monitor
  • AT&T Asset Management - Operations Center

And other IoT platforms can be added if needed.

9. Regulatory Compliance in Maximo 7.6.1.2

Maximo users can now add electronic signature keys to their profiles. When an electronic signature verification is required in an application, the user can enter their electronic signature key - if they don’t the record will not be saved. This is native to Maximo 7.6.1.2, and therefore can be used with more protocols such as SAML or OIDC.

10. Work Supervision and Work Execution Work Centers in Maximo 7.6.1.2

The following enhancements were made to Work Supervision and Work Execution Work Centers to streamline the work management process and improve efficiency for supervisors and technicians:

  • More signature options within Work Centers
  • Populating description field with IDs when no description is specified
  • Inspection launch from “Details” page of work order
  • Classification title added to “Details” page to classify work orders


Tuesday 6 July 2021

Maximo Anywhere 7.6.4 Upgrade


At the Beginning of 2020, IBM Released the much awaited Maximo Anywhere 7.6.4. It was one of the most awaited version as it removed the dependencies of Maximo anywhere on MobileFirst server. After a year of it's release , I finally got a chance to work on upgrade of Maximo Anywhere 7631 to Maximo Anywhere 764. Here in this article I will discuss my observation, understanding and view points of this renewed Anywhere solution from IBM.

Please note, with this article I am only sharing my views about Maximo Anywhere 7.6.4 and your experience with it could be different.

Installation: I upgraded Maximo Anywhere 7631 to 764. Maximo Anywhere components were installed on Macbook(v BigSur) and Maximo was maintained in a Linux server.

IBM upgrade Documentations has very clear explanation of the upgrade steps and I didn't face much of an issue. Here below are the steps followed:

  • Install and upgrade Maximo components. It was a smooth process where I didn't face much of an issue as my client's environment is free from any java customisation. So, upgrades are as simple as upgrading an OOB environment. The only thing that changed was to run includeanywheremodule.cmd or includeanywheremodule.sh from the <install_home>/maximo/deployment directory. Reference Document for this : https://www.ibm.com/support/pages/node/3225345
  • Install Maximo Anywhere components on Macbook. Installation manager does not support Macbook BigSur thus I had to install Installation manager and Maximo Anywhere components using the Silent mode(Click here for Silent mode installation documentation.).
  • Merge the the Client Specific customisation with Anywhere 764 code.
  • Build and deploy the new apps. This version builds and deploys the apps directly into Maximo. Maximo Anywhere builds an app.zip file and deploys it into Maximo and the same is downloaded into the device when App connects to Maximo. Maximo's Anywhere Administration> APPNAME > Deployment Tab displays the deployment date. Successful deployment can be verified in the deployment tab. You can also manually deploy the zip files using the deployment tab.

What changed in the installation process?

There is an added/optional step to install the Maximo Anywhere App container( just a naming convention and has no relation to containerisation). This extra step is required only if you have to build Native Android and iOS apps. Scenarios where you might need to do build Native apps:

  • Change app logos
  • Use chrome debug tools to debug the apps
  • Push Notification
  • Add new custom or LAFIX related cordova plugins
  • Your organisation is using MDM to distribute the apps
  • Your organisation does not want users to see the Connect page. This is something new in this version where if enabled users can see which environment they are connecting the app. This page appears only once after installation. If you want to change the url then you need to reinstall the app.

I faced a number of issues while building native iOS app , out of which a lot was due to provisioning profile issues. Also, IBM's native app build had a couple of bugs. I resolved one of the bugs and the other was resolved by the IBM dev Team. Following tech notes were created for those issue:

https://www.ibm.com/support/pages/node/6339723

https://www.ibm.com/support/pages/node/6447772

Changes for Maximo Anywhere Developers:

  • Customisation and Configuration: No Changes in the Anywhere Customisation and configuration. Previous experience and knowledge of Maximo Anywhere Configuration and Customisation still hold true.
  • Mobile First Server and Studio: The biggest change is that there is no Mobilefirst studio anymore therefore unit testing is a bit tricky. I use Android virtual devices to build and test the changes.
  • App Distribution : App distribution was handled by Application Center in Maximo Anywhere 7.6.3.1. We used Google Firebase Console to distribute apps to QA and other team members for Maximo Anywhere 7.6.4. Google's Firebase's app distribution is free(Firebase Documentation) .

Overall view points:

  • Most important change is the compute footprint is lesser as there is no Mobilefirst server. Theoretically ( yet to go live), the same configurations of Maximo JVM should be able to handle the load of Maximo Anywhere users. Clients can save the amount resources spent on provisioning and maintaining Mobilefirst servers.
  • Apps have better performance.
  • Building App zip is very fast. It is taking less than 30 seconds to build the app zip files and deploys into Maximo.
  • Maximo App Container build process too does not take more than 1.5 minutes.
  • Developer needs higher configuration devices to run a vm or local maximo installation and android virtual devices.
  • Developers need to learn bit more about debugging from Chrome debug tools, ADB, Android Virtual Devices and Xcode ,if required.
  • App Functionalities is not changed at all.

Thursday 11 February 2021

End of Support Announcement (EOS) for Maximo 7.6.0


Abstract

End of Support (EOS) Announced for Maximo Asset Management 7.6.0.x, Industry Solutions & Add-ons

Content

On 8 September 2020, end of support for all IBM Maximo Asset Management 7.6.0.x and compatible versions of products, including industry solutions and add-ons, was announced via IBM Announcement Letter # 920-136.


Effective 30 September 2021, fixes, patches, and telephone support are no longer provided for Maximo 7.6.x and its corresponding components and add-ons of the same version. Customers have 12 months of notification from the time of the announcement to the effective end of support date. It is encouraged that you plan to upgrade to IBM Maximo Asset Management 7.6.1.2.

Information on upgrading to Maximo 7.6.1 can be found on the Maximo Upgrade Resources page.
 

Details on EOS versions:

5724-U18

IBM Maximo Asset Management

7.6.0.x

IBM Maximo Asset Management Scheduler

7.6.0.x, 7.6.1.x, 7.6.2.x, 7.6.3.x, 7.6.4.x, 7.6.5.x

IBM Maximo Asset Management Scheduler Plus

7.6.4.x, 7.6.5.x, 7.6.6.x

IBM Maximo Linear Asset Manager

7.6.0.x

IBM Maximo Asset Management for Managed Service Providers

7.6.0.x, 7.6.1.x, 7.6.2.x, 7.6.3.x

IBM Maximo Asset Management for Internal Service Providers

7.6.0.x, 7.6.1.x, 7.6.2.x, 7.6.3.x

IBM Maximo Health, Safety and Environment Manager

7.6.0.x

5725-U87

IBM Maximo for Aviation

7.6.0.x, 7.6.1.x, 7.6.2.x, 7.6.3.x, 7.6.4.x, 7.6.5.x, 7.6.6.x

5724-U19

IBM Maximo for Nuclear Power

7.6.0.x

5724-U20

IBM Maximo for Oil and Gas

7.6.0.x

5724-U21

IBM Maximo for Transportation

7.6.1.x

5724-U23

IBM Maximo for Life Sciences

7.6.0.x

5724-U22

IBM Maximo for Utilities

7.6.0.x

5724-U28

IBM Maximo Asset Configuration Manager

7.6.0.x, 7.6.1.x, 7.6.2.x, 7.6.3.x, 7.6.4.x, 7.6.5.x, 7.6.6.x

5724-U33

IBM Maximo Calibration

7.6.0.x

5724-U36

IBM Maximo Spatial Asset Management

7.6.0.x

5724-T00

IBM Maximo Enterprise Adapter Oracle

7.6.0.x

5724-T00

IBM Maximo Enterprise Adapter SAP

7.6.0.x

5737-A43

IBM Maximo Asset Health Insights

7.6.0.x

5737-I74

IBM Maximo Asset Performance Management On-Premises (IBM Maximo APM - Asset Health Insights On-Premises)

7.6.0.x

IBM Maximo Asset Performance Management On-Premises (IBM Maximo APM - Predictive Maintenance Insights On-Premises)

7.6.0.x


Related Information

Resources are available for upgrade assistance
To further enhance your upgrade experience and planning, we are recommending managed transitions through IBM Global Business Services (GBS) or through your trusted IBM Business Partner that have been trained on the Maximo 7.6 upgrade process. IBM encourages you to contact our Global Business Services organization to receive further information about product upgrade options

Maximo Hosting options are available to streamline the upgrade process
Once you have upgraded, alternatives are available that provide an excellent way to eliminate capital hardware expenditures and the burden on your local IT infrastructure. Maximo Hosting Services provide flexibility and scalability, help maximize long-term ROI, and can enhance performance, availability and security.

Extended Maintenance is available if you are unable to upgrade at this time
Please note that if you are current on IBM Subscription and Support are on the latest version, 7.6.0.10, and are unable to upgrade before 20 September 2021, you do have the option to purchase an annual Extended Service Contract. To be eligible, clients must show that they are preparing an IBM Maximo upgrade roadmap. Extended service is priced at a premium and only available for two years. For additional details, please visit the IBM Extended Support page.

Related information

For a full list of products see the official announcement here:

Maximo 7.6.0.x EOS Announcement


IBM Readme for IBM Maximo Asset Management 7.6.1.3 Fix Pack

  Fix Readme Abstract This fix pack updates IBM® Maximo® Asset Management version 7.6.1, 7.6.1.1, and 7.6.1.2 Content IBM Maximo Asset Manag...