Thursday, 27 February 2020

Cloning a Maximo Anywhere 7.6.1 application

 I've recently been asked by multiple clients if we can provide some documentation on cloning a Maximo Anywhere application with step by step instructions going through the process.  If you have MobileFirst Studio setup the process is fairly simple as we do provide Ant scripts to complete this task.   If you haven't set up MobileFirst studio you can head on over to my blog  Configuring IBM MobileFirst Studio for Maximo Anywhere 7.6.1 for the walk through.  This will need to be completed before you can start the cloning process. 

So lets launch eclipse and get started. 

1.   The first thing you need to do is create your new Mobile application,  you can do this by right clicking on the Maximo Anywhere project,  select 'New' and then choose 'MobileFirst Hybrid Application'

image

2.  Once selected you will be prompted with a pop up showing the project name and asking you to enter your Application name.  You can call your application whatever you want,  I've just called ours WorkExecutionClone to keep it simple

image

You will now see your WorkExecutionClone application showing under 'apps' in your Maximo Anywhere project tree with an index.html showing Hello MobileFirst as you see below. 

image

3.  Our next step will be to add your device platforms and JSON store for your data, you do this by expanding your cloned application and clicking on the application-descriptor.xml. The file should open on the right hand side and show your cloned application with no features.  Ensure Application "WorkExecutionClone" is selected and then click on 'Add'

image

4.  You will now see a list of device platforms you can add,  I will add the follow three.
 
  • Android phones and tablets
  • iPhone
  • Windows8 - Universal
     Select each one and click on as seen below. 

image

5. Now back on the application-descriptor.xml design screen click on 'Optional Features'  then in the pop up we want to add the 'JSONStore', once done click 'OK'

image

In the end your descriptor should look similar to what you see below. 

image


6.   Now that we have our descriptor set up, we want to run the Anywhere App Clone ant script. From the root of the Maximo Anywhere project drag the anywhere-app-clone.xml over to the ant view then run the clone-app[default] script as seen below.

image

7.  You will now be prompted to enter the name of the application you want to clone and where you are cloning to. 

For the source application I am using Work Execution,  you can clone any of the out of the box applications if you do not want Work Execution. 

image

Then for the target application I've entered my WorkExecutionClone application.

image

8.  Removed step regarding platform update, does not appear to be required.

9.  Once the platform update completes, you will need to refresh the Maximo Anywhere project, right click on Maximo Anywhere and choose 'Refresh'

image

10.  The next step is to update the Maximo Anywhere build artifacts and trigger, again right click on the Maximo Anywhere project and choose 'Properties' at the bottom of the list. 

image

11.   In the properties menu select 'Builders then choose 'Anywhere Build (Artifacts, Build Configuration) and click on 'Edit'
image

12.  At the end of the edit screen you will see a menu item of 'Build Options',  click on it. 

image

13.   Now click on 'Specify Resources'

image

14.  Select the artifacts folder and app-feature.properties as you see in the screen shot below and click on finish.

image

15.  The next step is optional, but I'm adding this to the document so we can see this is our cloned application.  From the Maximo Anywhere project expand your WorkExecutionClone application - > artifacts and open up the app.xml.

Search for the following line. 

<message defaultMessage="Maximo Anywhere Work Execution" id="applicationName"/>

Replace with the following

<message defaultMessage="Maximo Anywhere Work Execution Clone" id="applicationName"/>

This will change the name on the log in screen of the application,  save and close the file. 

16.  The next step is Android specific and for barcode scanning,  open the AndroidManifest.xml from WorkExecutionClone - > native folder and update the application name from WorkExecution to WorkExecutionClone in the barcode activities as seen below. 

image


17.  We can now save our file and test out the application. 

From the Maximo Anywhere project right click on the 'WorkExecutionClone' application and choose preview. 


image


Launch the preview in chrome and your application should display as you see below. 

image

Another thing to note, if you are building for Windows using the ant scripts from eclipse after cloning your application, ensure you have updated the certificate used to sign the application to one that is valid. 

I hope this helps with your Maximo Anywhere development and deployment tasks,  as always any questions or concerns please comment below. 
Monday, 24 February 2020

Maximo Bookmarks

IBM Documentation

IBM Resources

Public Demo sites

Independent Blogs

Programming

Presentations and Roadmaps

Thursday, 20 February 2020

Ensure Maximo Asset’s serial number uniqueness

Sometimes you need to ensure the uniqueness of a certain database column in the Maximo database. A common example of this scenario is to ensure that asset’s serial numbers are not duplicated. This can prevent the creation of duplicate assets.

In this post I describe two techniques to achieve this using a unique database index or an automation script.

Unique Index

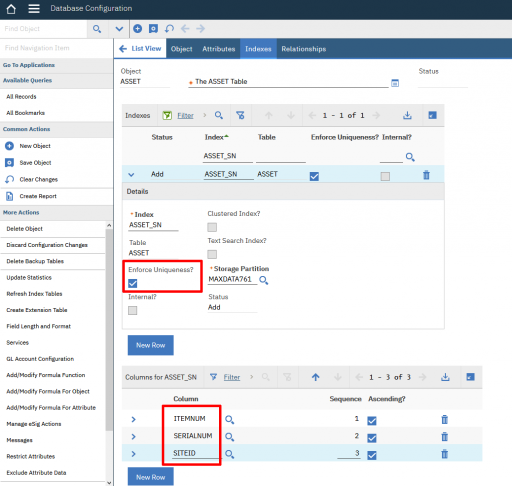
The simplest and most reliable way of achieving this is to define a unique database index on the SERIALNUM field of the ASSET table. However, we must make some considerations first. The asset serial is not unique alone for two reasons:
  1. Typically you enter the manufacturer’s S/N in the Asset serial number field. In theory two different assets with different part numbers can have the same serial number. This means that we typically have to include the ASSET.ITEMNUM field in the unique index.
  2. Maximo creates duplicate rows when moving an asset form one site to another. This means that we have to include the ASSET.SITEID field in the unique index.
Before proceeding it is important to perform a final check. We must ensure there are no existing rows in the ASSET table having index duplicates. This is to prevent errors during the database configuration fhase when Maximo will try to create the database index. This can be performed with an SQL query.
select SERIALNUM, ITEMNUM, SITEID
from ASSET
group by SERIALNUM, ITEMNUM, SITEID
having count(*)>1;
You will probably find some duplicated rows for assets having null values in the SERIALNUM or ITEMNUM. If you are able to solve all the issues (maybe inserting dummy values in duplicated rows) you can proceed creating the index in Database Configuration application.
Warning! Do not create the unique index if the above query returns data. The database configuration process will fail and you will have problems rolling back.

Automation Script

If you are not able to fix those problems you can use a dfferent approach based on a custom automation script to perform the same check. This allows to display a better error message when a user tries to saving an asset with a duplicated SERIALNUM, ITEMNUM, SITEID triplet.
# Script: ASSETSNVALIDATE
# Launch Point: Save - Add/Update - Before Save
# Object: ASSET
# Check for duplicated serial numbers

assetset = mbo.getMboSet("SAMEASSET")
if not assetset.isEmpty():
  params=[mbo.getString("ASSETNUM"), mbo.getString("SERIALNUM")]
  service.error("mxd", "dupassetsn") 
The launch point of the script must be on the ASSET – Before Save event.
A system message mxd.dupassetsn must be defined to correctly display the error to the user.
Asset {0} has the same serial number {1}
One last thing is to create the ASSET.SAMEASSET relationship:
  • Object: ASSET
  • Child Object: ASSET
  • Relationship: SAMEASSET
  • Where: assetnum!=:assetnum and itemnum=:itemnum and serialnum=:serialnum and siteid=:siteid

****Maximo custom CronTask using Automation Script ****


The use of Automation scripts is slowly taking the place of MBO java class file-based customization. It turns out this is also true when we will need to create custom CronTasks.

Today I am going to explain how we can create custom CronTask using Automation script.


When an automation script runs as part of a CronTask, the automation script does not require a launch point. You reference the com.ibm.tivoli.maximo.script.ScriptContask Java™ class in your cron task definition, and then you can attach an automation script to the cron task.

Step 1: create the Autoscript:

  • In the Automation Scripts application, on the List tab, select the “Create > Script” action.
  •  Specify a name, description, and log level for the script.
  •  If the script requires variables, in the Variables section, add new rows to declare the variable and bindings. You cannot specify bindings to a Maximo® business object. You can specify only LITERAL, SYSPROP, and MAXVAR bindings.
  •  Enter the source code of the automation script and click Create to save the automation script in the database.


#########################################################################################################################################################################

#

# Version       Date         Author                 Request #            Remarks

#   1.0       01/31/2020   Prashant Bavane    Test Custom CronTask   Test Custom CronTask
#

#########################################################################################################################################################################

from psdi.server import MXServer
from psdi.mbo import *

if arg:
 var1,var2=arg.split(",")

mxServer = MXServer.getMXServer()
userInfo = mxServer.getUserInfo("maxadmin")
assetMboSet = mxServergetMboSet("ASSET",userInfo)
assetMboSet.setWhere("assetnum='' and siteid='BEDFORD'")
assetMboSet.reset()
assetMbo = assetMboSet.getMbo(0)
assetMbo.setValue("DESCRIPTION",var1+"-"+var2)
assetMboSet.save()


Step 2: Creating the Cron task:

  •  In the Cron Task Setup application, create a new cron task definition.
  •  In the Class field, enter com.ibm.tivoli.maximo.script.ScriptCrontask.
  •  Create the cron task instance that runs the automation script.
  • In the Cron Task Instances section, add a row.
  • Specify the cron task instance name.
  • Set the schedule for when the cron task is run.
  • Select Run As User. The security authorizations that are granted to the specified user determines whether business logic that is related to Maximo business object can run in the script code. For example, a value cannot be set in a record unless the specified user has the security authorization to write values into that record.
  • In the Parameters tab, in the SCRIPTARG row, specify a value(s) that represents an argument for the cron task. To specify more than one value, separate them by commas.
  • In the SCRIPTNAME row, specify the name of the script that you created to run as part of the cron task. SCRIPTNAME is a mandatory parameter that must be populated. The script name that you specify is passed to the automation script in the form of the scriptName implicit variable.
  • In the Details section, select the Active check box to activate the cron task instance.
  • Save the record.


Now our script will run based on our defined cron task schedule.

Notes on the script:

  • Since this is being called from a cron task and not a screen, the ‘mbo’ object will be undefined.
  • We can pass in parameters to the script by using the SCRIPTARG parameter. This is a comma delimited list of values. To access it in our script, we access a variable called ‘arg’. Here is a example:
  if arg:
      srOwner,wfProcess = arg.split(",")

Since we can import the Java Class library, there isn’t much we can’t do with an autoscript that we can do in a cron task class file.

IBM Readme for IBM Maximo Asset Management 7.6.1.3 Fix Pack

  Fix Readme Abstract This fix pack updates IBM® Maximo® Asset Management version 7.6.1, 7.6.1.1, and 7.6.1.2 Content IBM Maximo Asset Manag...